Sunday 15 December 2013

Glitter Ombré Leopard Print Nail Art

These are my first set of uv gel nails since qualifying last week, I trained in all aspects of Nail care but uv gel nails have to be my fave ! 
With these I painted the whole nail white, then the bottom semi circle dark blue, then the middle with the blue glitter & went over with the leopard design.
I loved these & they sparkled so much in real life pity it didn't show up too much in the picture :( 
Xx

Thursday 28 November 2013

Tartan Take 2 ||Nail Art

I've attempted tartan nails art before & I'll be honest, it's a tricky one ! I'd say this attempt is better than my first, just need to perfect those damn straight lines !
It's literally your base coat- I chose a plain red from George @ Asda ( surprisingly good )
Painted two vertical line & four horizontal lines with a black nail art pen
Then a white cross- slightly off centre in white
Then finished with a top coat :)

Pastel Nail Art With Leopard Underside

So I've seen and done the "Loubiton" nails & though I'd mix it up by painting a leopard pattern on the underneath of my nails.
This only really works with false nails as the underneath needs painting before being applied.
Really easy though just paint the underneath of your flase nail about 2 3rds down with your desired colour/pattern apply your false nail then paint as usual :)

Monday 11 November 2013

Eyeballs & Bones || Halloween Nail Art & Make Up

I sported these bad boys at my 2nd Halloween party this year - my intention was to go as Edward Scissor hands but as Royal Mail screwed my delivery up my costume never arrived so last minute I decided to be Lady Gaga from the born this way video.

These nails have no relevance to lady Gaga but I think there great & gory ! 

Nail Art


Lady Gaga -Born This Way Make Up


Sunday 3 November 2013

There's no place like home ...

Wizard of Oz inspired nails, quick and easy using a pure red polish & two coats of Ciate Love Letter xoxo

Monday 28 October 2013

Tartan Nail Art

Step by Step guide to Tartan Nail Art
1 - paint your base colour. - mines burgundy by Opi
2 - paint a thick line (I used white) across the bottom or top of the nail not right at the edge
3 - go around the edge of the white line with black & one thin line through the centre then draw two vertical lines on the left or right side 
4 - in the bottom or top corner draw one horizontal & one vertical line over lapping each other
5 - finish with a top coat I used Glamour Glitter by Nails Inc

Sunday 20 October 2013

Halloween Nail Art - Cobwebs

It's almost that time of year again & to get you in the spirit here's the first of my Halloween Nail Art looks, this is a pretty simple look, that, to be fair can be worn all year round but is great for halloween ! 
You can alter this look to be done on every nail or change the colours although I think the simple black & white is most effective & most versatile !
Colours used :
La Femme : Black
White nail art pen
Rimmel : clear top coat 

Thursday 10 October 2013

Red & Gold Christmas Style Nail Art


I'm one of those people that will literally count down Christmas from August, so with only a couple of months to go I'm feeling super festive. I wanted to do some festive nails without them looking too Christmassy & scarring people when they see them that there's only 70 odd days to go :) 
This could be wore all year round really & would work in any colour variation depending on how you like them !
Colours used :
Ciate - burgandy 
gold nail art pen
Nails In Glitter top coat 

Monday 7 October 2013

Turquoise Zig Zag Mix & Match Glitter Nails


Couldn't decide what to paint my nails so I did a bit of everything haha !
Colours used : Headline Colours Pool Party
La Femme: Beige Grey
La Femme : Gold Glitter
Black & Gold Nail Art Pens

I want to do this again but different colours I love the design so much what colours shall I use next ? Xx

Thursday 26 September 2013

Marble Nail Art


I've had ago at water marbling a few times & sometimes it goes great, sometimes it literally looks like sludge :/ it's incredibly messy & quite a long process although you have to be pretty speedy whilst applying - sounds complicated I know but once you get the hang of it it's pretty easy. Search water marbling on YouTube & there's tonnes of tutorials :) my little finger smudged after doing this :( 


Dog tooth nail tutorial - http://youtu.be/spVVDoxf_m4

Xx

Wednesday 18 September 2013

All White Everything

Omg it's been so long since I posted :/ sorry! But while I haven't been posting I have been obsessed with white nails, I've just come back from 10 days in Ibiza & had white on my nails almost everyday, literally everyday on my toes & there still white now ! It's a very flattering toe nail colour ! With this look, like every look I couldn't leave it too plain so I went over with a glitter polish from Nail Inc & applied some gold gems to the bottom of each nail to add a bit of glam :)

Polish used :
Nails Inc - Gold Glmaour 
La Femme - White 

Tuesday 13 August 2013

Pink & White Ombré Nail Art

Haven't posted in sooooo long I've been I'll :( all is well now though thankfully & I'm back with a new take on my previous nail art post, I've gone with the ombré/ dip dye effect again but this time chose a much girlier look using a metallic white/silver polish for the base I went over the top half with a bright girly pink, followed with a palm tree design drew on with a small brush & finished with a few coats of clear polish I found this a great look as I was going to a festival & needed something that stood out, this really does work in pretty much any colour combination too ! 
What do you think ?!

Sunday 14 July 2013

Summer Ombré Nail Art !

Created with my new air brush nail art machine I was feeling super summery & decided to design an ombré design with pink & green polish I made myself by mixing a few colours together, then finished with a palm tree on my thumb nail & little gems on the rest, really in the Holliday mood now ! 

Saturday 6 July 2013

Pink, Purple & Nude Pattern Nail Art

An easy look I created the other day whilst sunbathing in the garden, this would look great with any colour combination depending on the look your we're going for, I went for a bright girly  combination for summer :) 

Sunday 30 June 2013

What's On My Face #1


These are my everyday products used on my face on a general day, if I'm on a night out I could probably double the amount of products photo'd :/ but these give me the right amount of coverage & a comfortable amount of product for my everyday life
After I've cleansed & moisturised I start with the Garnier BB Miracle Skin Perfecter Oil Free BB cream in light for a radiant yet matte finish, I then move on to my eyebrows using an angled eyebrow brush & Revlon Vital Radiance Brow Powder in Blonde to fill in my brows, this kit is great as it has two shades as I do like to mix mine up & change the colour sometimes. I then conceal under my eyes & over any(or lots in my case) blemishes & then contour with my Make Believe Bronzer, which is a great dupe for Nars Laguna ! I use my Real Techniques brush for this, going under the cheekbones around the forehead & round my jawline, I then curl my lashes & go for my Sleek Au Naturel pallet & usually go for the first shade with is a pale gold with shimmer all over the lid & under the eye, then take the medium matte brown shade along my crease, using my Real Techniques multi task brush I brush Rimmel Stay Matte in Translucent all over my face :)  


Friday 28 June 2013

Dogtooth/ Houndstooth Nail Art Tutorial


So like I said I've made a quick & simple tutorial on how to do nail art :) click below for the link & please like the video if you enjoy ! :)

Saturday 22 June 2013

Dogtooth Nail Art

Haven't posted in so long !! But these are my current nails, a mix & match design with dogtooth or houndstooth whatever you want to call it on the accent nails, I'm going to do a dogtooth tutorial next as everyone is always asking how its done & it really is quite easy :) 

Tuesday 21 May 2013

Headline Colours Poolside Party

Headline Colours a the brand new, must-have nail color collection following the heartbeat of fashion, offering a capsule collection of only the hottest nail colors based on the very latest fashion trends. A gift in Mays Glossybox I was so excited to try this I received the colour Poolside Party, a bright turquoise, one coat gave great coverage but I used two out of habit, not being able to simply paint my nails one colour I used nail art strips, available from eBay for around £1 ! 

For this look I painted 3 nails gold then applied the strips randomly across the three nails then painted over every nail with the turquoise & left to dry for around 5 mins, took the strips off & covered the nail in clear polish.

I would defiantly recommend this polish, the shades are fashion forward, have great coverage & last for ages ! 

Poolside party £9  http://headlinecolors.com/poolside-party/


Tuesday 14 May 2013

Neon Green & Gold Checked Nail Art


I'm loving neon green & yellow at the moment so here's a quirky take on one of spring/summers colour trends :)
Products used
Ciate: Mojito
Models Own: Gold Shimmer


Friday 10 May 2013

My Hair History !

This post could be so long it's unbelievable, I've literally had pretty much very colour & style there is, some I'm not very proud of looking back haha. I wanted to do this post mostly as something to look back on when I'm thinking of doing something drastic & realising it may not be a good idea.

I was born with super curly blonde hair which straightened at the age of about 7, I manage to hide away from cameras through my teenage "chavy" stage (thank god) but I've found one with my trademark slick down look :/ I then found dye, I've died my hair bleach blonde, black, brown, ginger & purple to name a few.

At the moment im trying to grow out all the dye & see what's been hiding for so long, so I've got an unintentional dip dye look going on, but at the moment I love it ! & my hair does too its never been so healthy, anyway here's some pictures most of which embarrassing but hey, we've all been there right ?


Wednesday 1 May 2013

crabtree and evelyn somerset meadow hand cream

Acquired in Aprils Glossybox, this new hand cream by Crabtree & Evelyn (the Somerset meadow collection) is my new must have hand cream ! For those of us who love our nails & decorating them in any way possible, your hands tend to pay the price, feeling dry & damaged from chemicals like nail polish remover this cream locks in moisture, Infused with shea butter, macadamia nut oil and a fresh green fruity-floral scent, this intensive cream nourishes skin so it's noticeably smoother after each use.

*Contains hydrating ceramides and conditioning water lily and ivy extracts
*Myrrh extract helps condition nails and cuticles
*Formulated without colour, mineral oil, parabens, phthalates or propylene glycol
*Fragrance: The fresh scent of wildflowers mingles with dewy green notes of ivy and water lily, whilst fruity accords of blackberry and bergamot add a hint of sweetness.

Rrp: £14 from www.crabtree-evelyn.co.uk

Sunday 28 April 2013

Twilight by Ciate

It was my birthday on the 24th so I went out to celebrate on the 26th, the outfit I wore was a bright coral polka dot bodycon dress & huge wedged so I toned down the nails & went for a simple look with Twilight by Ciate, I got this in my Ciate advent callendar & it's almost empty :(

Friday 12 April 2013

POW ! Comic Strip Nail Art Tutorial

So here's my tutorial for Comic Strip inspired nail art, a popular design from the infamous WahNails, really quite easy to do with the right tools & patience. You ll need 5 bright colours for this look, a black & a white nail art pen & a clear top coat.

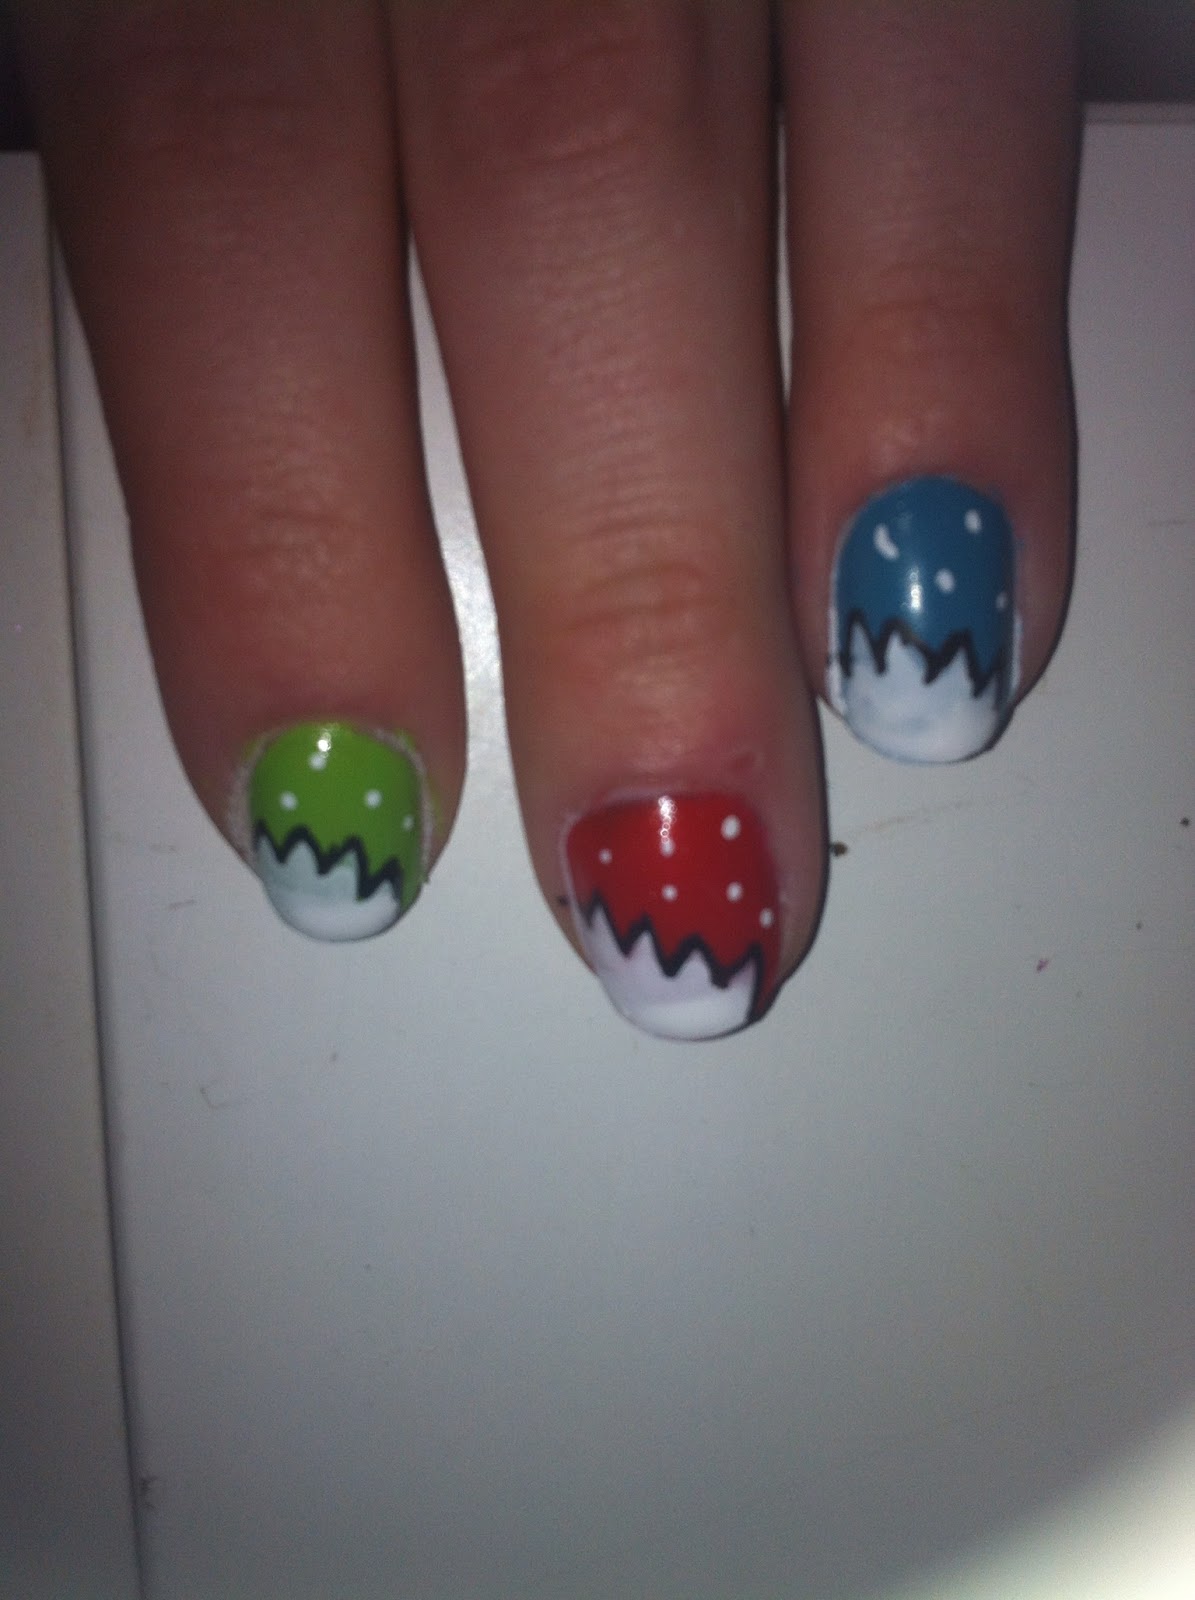
* Paint your nails each with a different colour polish.

* Once dry, with your white nail art pen draw a white semi circle in one top corner of the nail, then give the edges a zig zag design.
 
 
* Draw small white dots on the rest of nail.

* Outline the white zig zag pattern with your black nail art pen.
 
 
* Then go on to write your comic themed words in the white area.
 
 
* Finish with a clear top coat after the pen has dried & then your done :)


The colours i used were Ciate Mistress 039, Ciate Big Yellow Txi 074, Ciate Headliner 066, Models Own Candy Pink Pro 033 & Ciate Mojito 019.